As a mainly vegetarian for many years I sometimes run out of inspiration, or get in a food rut. Often the solution to this is a good cookbook (like Plenty by Ottolenghi) but more recently my solution has been to #eattherainbow.
The scientific basis for it might be rubbish, but it is a great way to put together a plant based meal that looks great, and gets you eating new things.
For each meal I try get in some purple, red, yellow, green and white.
Instagram trawling provides some nice ideas for what this might look like. Here are some pics of random meals I’ve thrown together along these lines.

Japanese style with spicy tofu, soba and enoki soup, Chinese broccoli with togarashi, seasoned laver and purple asparagus.

Beetroot slaw, chèvre, seeds and sumac salad with boiled new potatoes.

Kale, zucchini and onion, beetroot & feta bruschetta, sweet potato fries.

Red cabbage salad with tomato, cucumber, crispy fried shallots, green herbs, cucumber and yuzu dressing.

Burghul stuffed caps, saffron cauliflower, sweet potato, cucumber & cottage cheese salad etc.
In anticipation of running the Blackmores half marathon tomorrow i’ve made a batch of my homemade gel – might be of interest to other hippie runners.
I’m a whole foods lover, and try stick as close as possible to things that are not in packets, or have labels with only a couple of ingredients.
When I started training for my first marathon I tried a couple of Gu gels because it seemed the thing to do. A few things were apparent:
1. They were expensive. At $3-4 a pop fueling for a long run became a real cost.
2. They generate annoying sticky rubbish to either carry with you or try find a bin for.
3. They taste gross. I tried a few and frankly eww.
4. The list of ingredients has things whose identity was
5. My stomach did not like them. At all.
So I did what any sensible person does: I asked google for alternatives. There are quite a few sites with complicated recipes involving powdered this and that – but I wanted something as close to a real food as possible.
I came up with the following:
– 5-10% blackstrap molasses
– 45% brown rice syrup
– 45-50% honey
– generous pinch of salt
 It’s pretty tasty, you mainly taste the honey but the dark mineraliness of the molasses comes through too.
I carry this in a little squeezy tube that I got from Paddy Pallin. In a half marathon this is sufficient with a generous squeeze into my mouth every half hour.
In a full I use homemade energy drink for the first half, then water & homemade gel the second half.
The three ingredient jars cost less than $20 from the health food store & make tons & tons of gel.
This moist loaf cake can be made easily with cupboard staples and the dates mean it stays gorgeously moist. I swapped out half the nuts for Kapai Puku for that extra seedy crunch. It went down a great at the picnic I was at.
Adapted from this recipe.

Ingredients
100g butter – salted or non-salted as you prefer
1 cup medium brown sugar
1 cup chopped pitted dates
1 teaspoon all spice
1 teaspoon bicarbonate of soda
2 eggs, lightly beaten
1 1/2 cups plain flour + 3 tsp baking powder
150g mixed nuts & Kapai Puku (I used pistachios & slivered almonds)
1/2 cup or more of grated carrot (2 small or 1 medium carrot)
1 cup cold water (tap is fine)
Method:
1. Preheat oven to 180c & grease loaf tin (I use a silicon one which just needs a spritz of oil)
2. Put butter, sugar, dates, allspice & a cup of cold water in a pot, heat gently until butter melts, then bring to the boil.
3. Once boiling remove from heat and add bicarb – it will foam up! Cool until skin temp.
4. Stir in eggs, carrot, and nuts & seeds. Then add flour.
5. Bake at 180c for 45-50 minutes until nicely darkened & toothpick comes out clean.
6. Cool in tin for 5 mins, then on wire rack until cool.
If taking this to a picnic then slice once you’re at your destination. Transports well back in tin or just wrapped in paper & glad wrap.
The first time I made ricotta I was blown away how simple it was. That said, it doesn’t work out particularly cheaper to make it yourself.
Haloumi however seems to be a different matter. I saw this recipe on the Guardian website & was struck that what is probably my favourite thing to BBQ looked so simple to make.
Apart from usual kitchen things all it needs it vegetarian rennet & a thermometer. I bought both of these on eBay for about $6.00 each & of course they can be used again. The milk I used was a gorgeous 2L of Jersey milk short dated @ Harris Farm and therefore on special for $3.64 – made just over a usual packet size of haloumi – not bad value overall.
I followed the recipe exactly so I won’t repeat it here, but I do want to recommend you try it. I did however make it 1/5 of the original size, who buys 10 litres of milk?
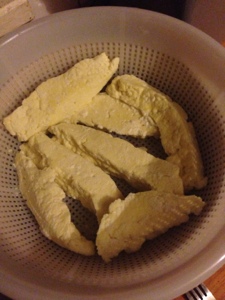
Here are the drained curds before the final poaching stage.
And the end result fried and golden and glorious.

And here’s a link to the recipe again. Bookmark it for later?
Don’t forget to save the whey, it can be used to make a particularly nice & I fussy ciabatta.
Making treats for work morning tea at my office has a few challenges: one person is no nuts, one is vegan and my kitchen has no food processor or other appliances.
Challenge cooking is my favourite though, so no problem! This time ended up making my new favourite super food treat, it’s easy & quick, not much washing up & you may even have everything for it in your cupboard and fridge.

It’s vegan nut free baklava. Yes.
The secret ingredient is Kapai Puku, a seed blend that is my favourite for porridge or gorgeously chunky Bircher muesli. It’s also wonderfully nutrient packed, great for marathon training season refueling. I used the original blend, but any of them would work.
This is my first time making more than breakfast with it and I am hooked. It ain’t cheap but it is jam packed full if goodies. I got mine at David Jones Food Hall, but most health food stores would stock it & you can buy online.
I considered using vegan butter but really it’s just oil with additives, so I just used oil – still got a lovely crunch to the pastry.
So here goes:
1.5 cups Kapai Puku + 1 tbs sugar
Sunflower oil
Filo pastry (half a pack – sheets cut in half to fit tin)
Brush each sheet with oil & layer half the pack of filo into the baking dish. Top with Kapai Puku then layer on remaining pastry. Cut into diamonds, or squares if you’re me & find diamonds too complicated.
Bake at 160c for 20 mins, then sprinkle on 2TBS of cold water. Bake another 15 minutes at 200c.
While it’s baking make the syrup
1 cup sugar
1/2 cup water
Few strips lemon and/or orange peel
Drops of rose essence
Squeeze of lemon juice
Heat up on medium till sugar is dissolved & the whole thing is thickened a bit. Add a squeeze if lemon at the end.
When pastry is done baking pull it out & pour over the syrup. Cook and eat.

I recently did my first ever cooking class – with City East Community College. It was a half day class on “Middle Eastern Vegetarian Cooking” and it was delicious.
My favourite thing we made (apart from Za’atar) was the baklava – who knew it was so easy?!

Made a batch at home the very next day. If you make a batch with half a pack of filo pastry then the other half can be spanakopita for 2-3 people, perfect amounts for me & my fella.
Smash some nuts
Ingredients:
Walnuts
Pistachios
Blanched almonds
1 tablespoon sugar
We used about 1/2 a cup each of pistachios, blanched almonds and walnuts. I imagine you could adjust this to whatever you like. Use a food processor, or a spice grinder like I did to smash this up into coarse sand (or chunkier or smoother if you want).
Set up your pastry station
Ingredients:
Smashed nuts (from above)
Half packet filo pastry – covered with a teatowel to keep it from drying out
100 grams or so of melted butter (or vegan alternative – a sweeter oil like macadamia maybe?)
Assemble your souramenos
Work one sheet of filo at a time and make sure the others are covered so they don’t dry out. Brush your sheet with butter – a few lines should do, sprinkle a handful of the crushed nuts then working from one of the long ends scrunch it up so you end up with a long piece of pastry and nuts – folded a bit like a fan. Then work from one end to roll it tightly into a spiral and place this into your baking tin.

Once they are all done bake at 200c for around 20 minutes or until they are starting to colour nicely. Then drizzle over a few tablespoons of water and bake for another 5 minutes – this apparently ensures that the centres are cooked.

While they are baking make the syrup.
Ingredients:
2 cups caster sugar
2 cups water
Pieces of lemon and/or orange peel
Few drops of rosewater or orange blossom (can be overpowering so go easy!)
Lemon juice
Combine sugar, citrus rind and the water in a pot over medium heat and stir to dissolve sugar, then reduce heat to low and simmer for about 20 minutes, should be syrupy but not caramel. Towards the end add the juice of about half a lemon and some drops of rosewater or orange blossom.
Pull your golden little pastries out of the oven, pour over the syrup and let cool. Then eat them! They are not as sweet as many of the store bought ones, and have a lovely citrus note.

I love the trashyness of dude food, but in Oz it’s relatively rare to find a vego version of it that isn’t just beans and cheese in place of flesh. That’s ok in a burger, but for chilli fries you need some good old processed faux flesh to make it awesome enough to justify both the fussiness and the glorious disgustingness of the outcome.

To make chilli fries you need to make two things: chilli (con quorn) and fries. You will also need cheese and jalapenos when assembling.
First make the chilli, you can even do it the day before, maybe two days – chilli does just keep getting tastier as it waits to be eaten. You won’t eat a full batch on your fries obviously so it’s good for lunch or dinner for another couple of meals – just add cornbread on the side or rice or pasta like Americans do (weird).
Ingredients
Chilli’s not really a recipe as far as I’m concerned, it’s something I have always cooked by feeling – mainly by copying what my mum did. Use your own favourite chilli recipe instead if you want!
Soffrito (diced carrots, celery and onion – just onion is ok too)
Couple cloves chopped garlic
2 x 400 grams tinned tomatoes (or a bottle of passata is ok too)
1 packet of Quorn mince
Chilli powder/cayenne/fresh chilli to taste (or all of these)
1 stock cube
2 bay leaves
Method
Heat oil in a large saucepan over medium, add mince and cook for a few minutes.
Add soffrito and garlic and fresh chilli if using – cook until soft.
Add chilli powder/cayenne and cook, stirring regularly until it smells good.
Add tomatoes, stock cube, bay leaves and some water (about half a cup) and bring to boil. Then turn to medium and simmer for half an hour or until it’s as thick as you like and tastes good. Taste regularly and add salt pepper and any additional spices whenever you want.
Then make the fries.
Ingredients:
Potatoes – try find a variety that is good for fries (derr).
Oil – canola or sunflower is fine.
Method
Heat oven to its highest setting – mine goes to about 260c which worked well.
Peel potatoes or don’t – then cut into 1 cm slices, and cut slices into 1cm sticks.
Blanch sticks in boiling water for 3 minutes, then drain and pat dry.
Place chips into roasting pan (make sure they’re not too crowded!), drizzle with enough oil so they are well coated and season with salt and pepper. Bake for about 20 minutes turning half way through until they are lovely and golden.
Then the magic happens
Place the fries on a plate or serving platter, heap on some chilli add some home pickled jalapenos (more of which another time) and grate on some cheese.
Serve with beer. Lots of beer. Have icecream for dessert.

I adore frangipane and am wild for fruit pies and tarts – putting them together is a dangerous thing. This tart is incredibly simple and quite gorgeous looking, but takes a little while if you chill the pastry twice like you are supposed to. I should probably admit that it never gets two full chillings at my house, and still comes out just fine.
This recipe is a version of the one on Simmer Boston. 
Ingredients
Pastry
1 1/4 cup plain flour
125 grams butter cubed
1 egg yolk
2 tablespoons caster sugar
Cold water as neccesary (2+ tablespoons)
Good pinch of salt
Plums and frangipane
Plums – about 10 depending on size, not too ripe so they hold their shape.
I used a mix of colours which was quite pretty.
125g butter, softened
125g caster sugar
2 eggs
125g roasted ground almonds/almond meal
1 tablespoon plain flour
Make the pastry (use your Kenwood/KitchenAid)
Put sugar, flour, butter and a good pinch of salt into your stand mixer with the paddle or K attachment and mix till nice and crumbly,
Whisk egg and water together in seperate bowl and add into stand mixer, mix on medium until a smooth dough. Wrap dough into ball in plastic wrap and chill for an hour or so or for as long as you can bear.
Make the frangipane filling.
Cream the butter and sugar together in a mixing bowl with your hand mixer (or use stand mixer again) until light and fluffy.
Add eggs a bit at a time till combined then turn off mixer
Use a wooden spoon to fold in the almond meal ground almonds and flour.
Prepare the plums
Cut plums in half to remove seeds, then slice into even segments – about 12 per plum is nice.
Grease your tart tin, I used a rather unattractive bright green silicon one which I sprayed lightly with oil spray because I am lazy and YOLO. It worked just fine – I might be coming around to these silicon thingamajigs.
Take dough out of fridge and place onto floured bench top and roll out so it would overlap edges of your tin. Transfer over with your rolling pin like the clever clogs you are. Patch up any holes with spare pastry. Oops! Then put back in fridge for half an hour or as long as you can bear.
Have a cup of tea, and nibble on extra or wonky plums.
Preheat oven to 200c, and assemble tart.
Pour frangipane into tart, stick plums into it in some semblance of a pattern.
Bake at 200c for about 30 minutes – until it is nicely burnished on top. Serve hot or warm or cold (I prefer it cold) with some double cream.

I never understood the attraction of ‘upside down cakes’ when I was younger, mainly because they often had tinned pineapple on them in our neck of the woods. Why anyone would do that is beyond me.
With this however the magical flip and reveal is a beautiful moment, set off nicely by the terror of burning yourself on scalding hot caramel.
The result is so exquisite that the ridiculously easy prep and short shopping list seem almost unfair. This is the perfect thing to do with that spare sheet of puff pastry hanging about in the freezer..

Isn’t that the prettiest thing you ever saw?
Ingredients
1/2 cup of caster sugar
40 grams butter cubed
3 corella pears (or beurre bosc) peeled, cored and quartered
1 sheet frozen puff pastry (yes I will learn to make this myself one day!)
You will also need a smallish oven proof pan – I used a 17cm enamel cast iron pan like this. If you use a bigger pan just up the ingredients a smidge, it’s not rocket science.
Method
1. Take out sheet of puff pastry to defrost
2. Heat oven to 190c
3. Put sugar in base of pan and place onto medium heat, watch carefully – try not to panic that you are essentially frying sugar. It will start to melt, shake it around until its all melted and let it colour to a rich caramel (darker than a Werther’s original), then remove from heat
4. Add in cubed butter, put it back on the element if if needs help melting, swirl it around but don’t stir.
5. Add your pear quarters, round side down (this will be the top) putting in as many as you can, they will give a little as they cook
6. Take your pastry sheet which will be almost defrosted by now, cut a rough circle a bit bigger than the pan and put this on top, use a knife or spoon to tuck it in around the edges & slash it a few times to let steam out.
7. Bake for about half an hour – you want the top to be a nice dark brown.
Then remove and rest for a few minutes while you grab your icecream & plates.
8. Shake the tart gently in the pan to dislodge it. Put a plate on top and using oven mitts flip it over, et voilà!
The pastry should be nice and dark when you remove it, this will mean the pears are nice and tender.

Sometimes you need to make a sweet treat for work or a picnic and you want something super simple, very easily portable (particularly if you live in a tiny apartment like me and have no cupboard space for cupcake carriers and their ilk) and delicious.
You could take fruit, and 90% of the time that would be my go-to, but sometimes fruit just ain’t going to cut it!
On such occasions I make chocolate spiders. They are like a better version of chocolate crackles and don’t involve copha, because frankly that stuff is creepy. The darker chocolate and pure PB make these a little healthier than they might otherwise be.. (though the ingredients in the noodles are a bit scary)

You will need:
- 1 packet of Chang’s ‘original fried noodles’ (100 grams)
- 2 tablespoons of peanut butter (100% peanuts preferable)
- 200 grams bittersweet/dark chocolate.
Method:
- Melt chocolate and PB in a bowl over a pot of hot water (or in a microwave if you have one).
- Add noodles and stir (you may also want to add some salt or chilli powder to spice things up).
- Spoon mix into patty pans or baking paper if preferred then refrigerate till set – about an hour at least.
- If you take them to a picnic make sure you are fast and have one before everyone else eats them!
I have no idea how long they would last but they have never ‘lasted’ longer than a day in my house.

